
TL;DR
Learn how to add authentication to MCP servers using Microsoft Entra ID with a ready-to-use .NET template.
Source code: https://github.com/NikiforovAll/mcp-template-dotnet
Introduction
Without proper authentication, sensitive data and critical business operations become vulnerable to unauthorized access, potentially leading to security breaches, data leaks, and compliance violations. This fundamental security principle applies not only to traditional Web Applications and APIs but also extends to emerging technologies and protocols such as the Model Context Protocol (MCP). Recently, the MCP Specification has been extended to include OAuth 2.1 support. This specification defines the authorization flow for HTTP-based transports.
The Model Context Protocol provides authorization capabilities at the transport level, enabling MCP clients to make requests to restricted MCP servers on behalf of resource owners.
💡 It is a good idea to read the specification before you proceed with this blog post. But if you are short on time, take a look at the diagram below. It shows a sequence diagram of the authorization flow between an MCP client, an MCP server (resource server), and an authorization server.
from WWW-Authenticate C->>M: GET /.well-known/oauth-protected-resource M-->>C: Resource metadata with authorization server URL Note over C: Validate RS metadata,
build AS metadata URL C->>A: GET Authorization server metadata endpoint Note over C,A: Try OAuth 2.0 and OpenID Connect
discovery endpoints in priority order A-->>C: Authorization server metadata Note over C,A: OAuth 2.1 authorization flow happens here C->>A: Token request A-->>C: Access token C->>M: MCP request with access token M-->>C: MCP response Note over C,M: MCP communication continues with valid token
What this means in practice is that every MCP server will now be able to provide this document in a well-known location: https://my-mcp.io/.well-known/oauth-protected-resource
MCP clients are supposed to check for well-known OAuth 2.0 Protected Resource Metadata (RFC9728) before making requests to MCP servers. This metadata will include information about the authorization servers that the MCP server trusts.
{
  "resource": "https://localhost:7000",
  "authorization_servers": [
    "https://login.microsoftonline.com/9763c9ca-4551-4032-b438-43a1397592e2/v2.0"
  ],
  "bearer_methods_supported": [
    "header"
  ],
  "scopes_supported": [
    "api://6ae92ebf-ab73-4722-afd8-042259671aee/Mcp.User"
  ]
}
Getting Started
I’ve prepared a dotnet new template that will help you quickly scaffold a new MCP Server project.
dotnet new install Nall.ModelContextProtocol.Template
# Template Name      Short Name         Language  Tags
# -----------------  -----------------  --------  -------------
# Template Name         Short Name            Language  Tags
# --------------------  --------------------  --------  -------------
# MCP Server            mcp-server            [C#]      dotnet/ai/mcp
# MCP Server HTTP       mcp-server-http       [C#]      dotnet/ai/mcp
# MCP Server HTTP Auth  mcp-server-http-auth  [C#]      dotnet/ai/mcp
# MCP Server Hybrid     mcp-server-hybrid     [C#]      dotnet/ai/mcp
Now, we can create a new MCP Server project using the template.
dotnet new mcp-server-http-auth -n McpAuth -o McpAuth
# The template "MCP Server HTTP Auth" was created successfully.
Let’s take a look at Program.cs:
var builder = WebApplication.CreateBuilder(args);

builder.Services.AddHttpContextAccessor();
builder.Services.AddScoped<UserService>();

builder
    .Services.AddAuthentication(options =>
    {
        options.DefaultAuthenticateScheme = JwtBearerDefaults.AuthenticationScheme;
        options.DefaultChallengeScheme = McpAuthenticationDefaults.AuthenticationScheme;
    })
    .AddMcp(options =>
    {
        var identityOptions = builder
            .Configuration.GetSection("AzureAd")
            .Get<MicrosoftIdentityOptions>()!;

        options.ResourceMetadata = new ProtectedResourceMetadata
        {
            Resource = GetMcpServerUrl(),
            AuthorizationServers = [GetAuthorizationServerUrl(identityOptions)],
            ScopesSupported = [$"api://{identityOptions.ClientId}/Mcp.User"],
        };
    })
    .AddMicrosoftIdentityWebApi(builder.Configuration.GetSection("AzureAd"));

builder.Services.AddMcpServer().WithToolsFromAssembly().WithHttpTransport();

var app = builder.Build();

app.UseAuthentication();
app.UseAuthorization();

app.MapMcp().RequireAuthorization();

// Run the web server
app.Run();

// Helper method to get authorization server URL
static Uri GetAuthorizationServerUrl(MicrosoftIdentityOptions o) => new($"{o.Instance?.TrimEnd('/')}/{o.TenantId}/v2.0");
Uri GetMcpServerUrl() => builder.Configuration.GetValue<Uri>("McpServerUrl");
As you can see, this project template uses Microsoft.Identity.Web to authenticate users with Microsoft Entra ID (formerly Microsoft Active Directory). The interesting part here is the use of McpAuthenticationDefaults to configure the DefaultChallengeScheme. This is a special scheme that is used to challenge a user and MCP Client for credentials.
☝️ As a developer, you don’t even need to know how this works under the hood. All you need to do is to carefully configure all components:
McpAuthenticationHandler : AuthenticationHandler<McpAuthenticationOptions>, IAuthenticationRequestHandlerby usingMicrosoft.AspNetCore.Authentication.AuthenticationBuilder.AddMcpmethod.ProtectedResourceMetadatais used to describe the protected resource that the MCP server exposes, including its URL, the authorization servers it trusts, and the scopes it supports.DefaultChallengeSchemeasMcpAuthenticationDefaults.AuthenticationScheme. Thus, the “dance” of OAuth 2.1 begins.
Configure Microsoft Entra ID
As you may have noticed, the configuration relies on MicrosoftIdentityOptions. When you call AddMicrosoftIdentityWebApi, it automatically adds them to the DI based on configuration.
{
  "AzureAd": {
    "Instance": "https://login.microsoftonline.com/",
    "Domain": "t4mwx.onmicrosoft.com",
    "TenantId": "9763c9ca-4551-4032-b438-43a1397592e2",
    "ClientId": "6ae92ebf-ab73-4722-afd8-042259671aee",
    "ClientSecret": "<my_very_secure_secret>"
  }
}
To get them, you will need to create App Registrations in Azure AD.
- Go to Azure and click “+New Registration”
- Specify “Name” and “Supported account types”.
- Add Single-page redirect URLs: https://localhost:7000/ and create a new app.
- Generate a secret by using the “Certificates & secrets” tab.
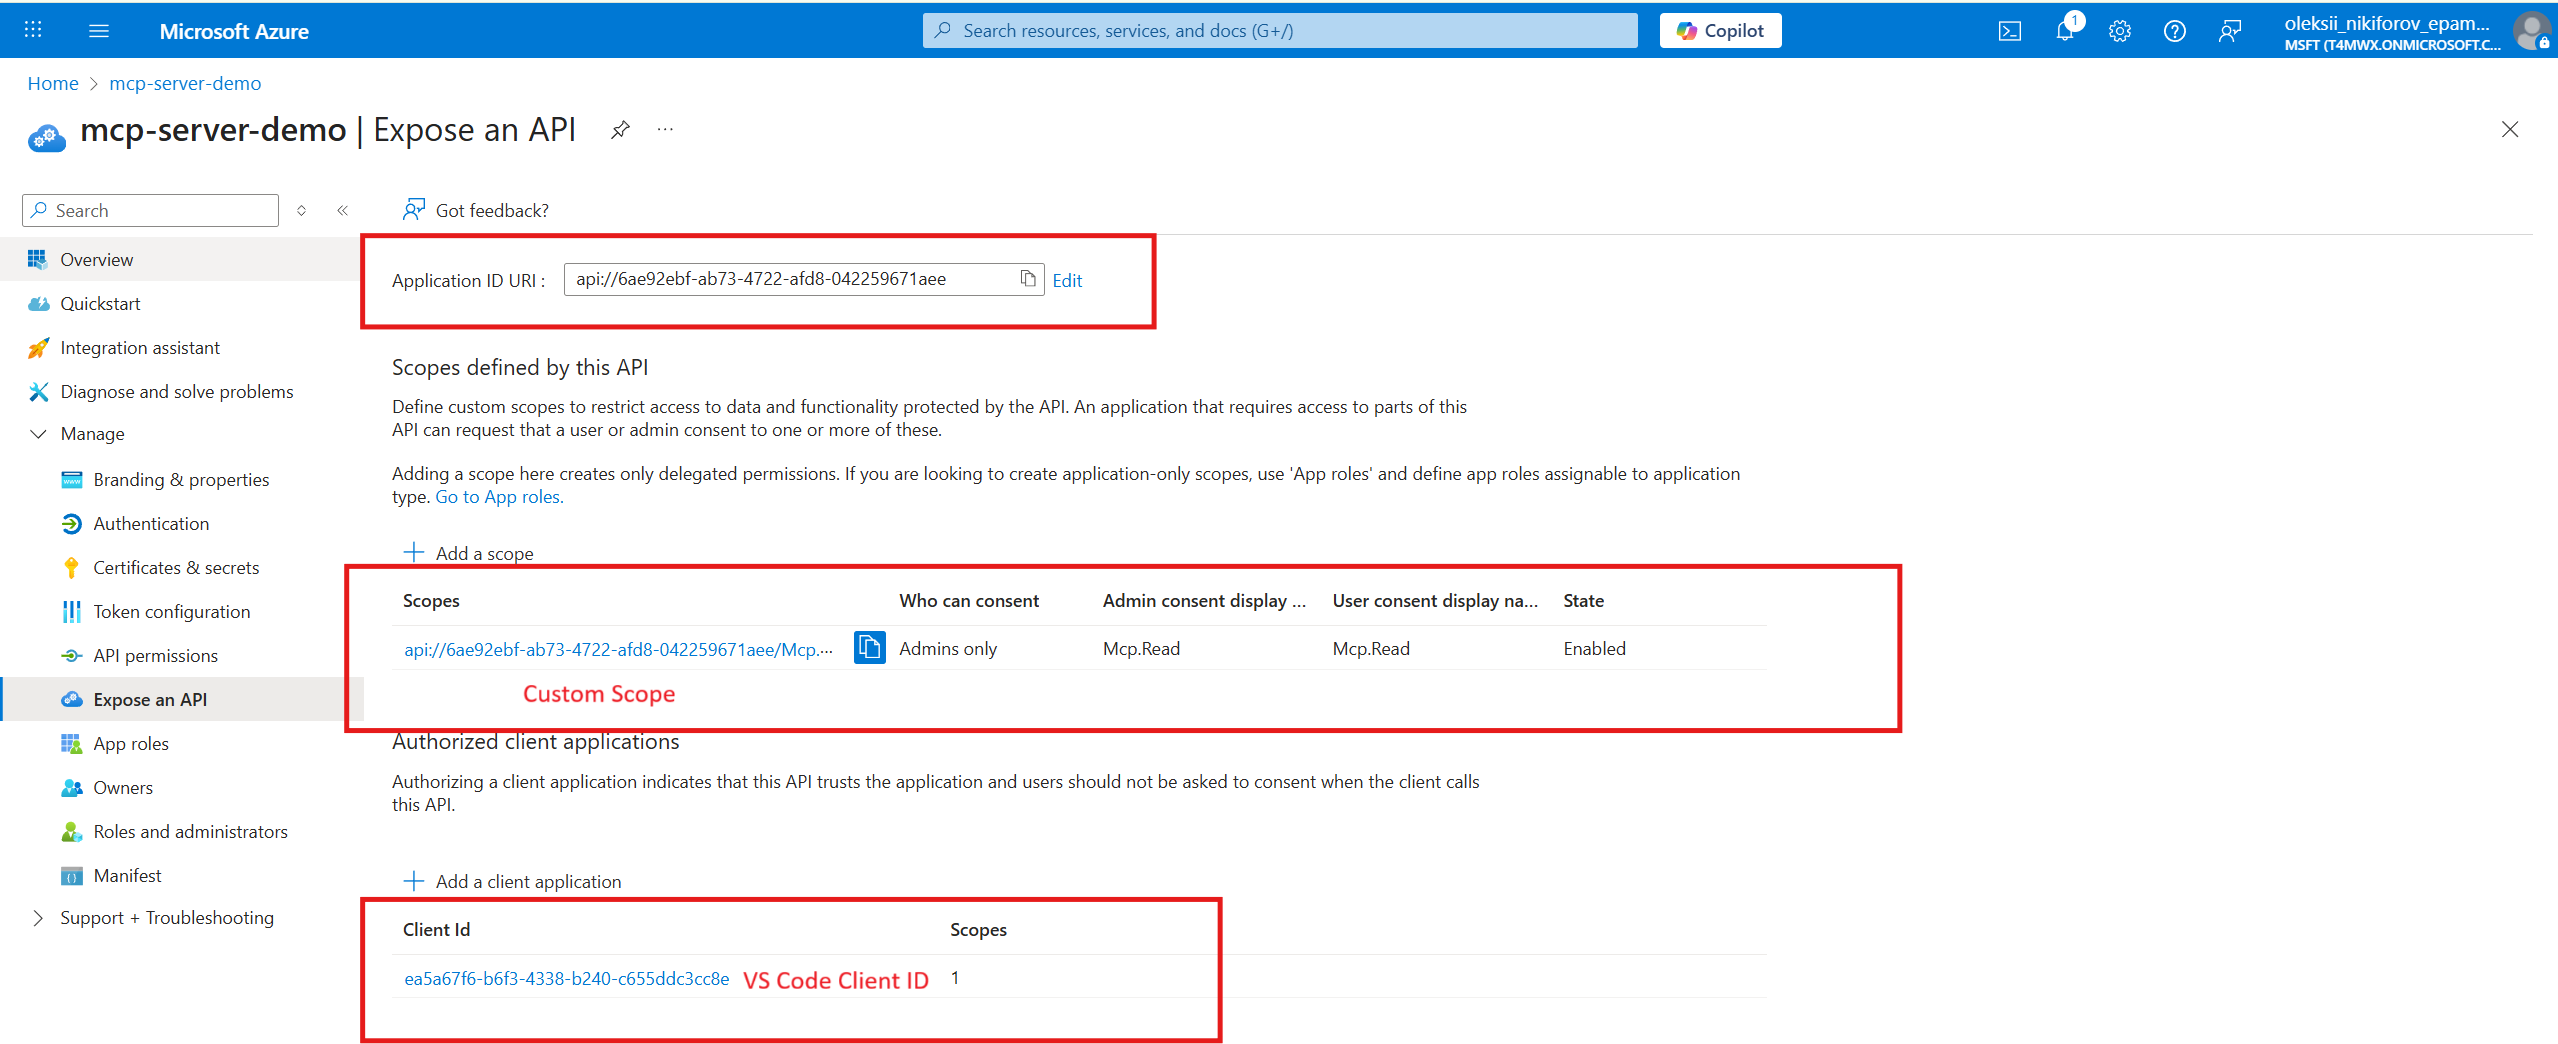
- Click “Expose an API” and add a new scope called
Mcp.Read. - Add Pre-Authorized Applications. This is the well-known ID of VSCode - “ea5a67f6-b6f3-4338-b240-c655ddc3cc8e”. Note: if you want to support additional applications, you will need to add their client IDs here.
Demo
Create a .vscode/mcp.json with the following content and run the “Echo” MCP Server:
As you can see, we were able to authenticate to Microsoft Entra ID and obtain an access token for the MCP server. The user’s identity was successfully retrieved from the access token using UserService.
public class UserService(IHttpContextAccessor httpContextAccessor)
{
    public string? UserName => httpContextAccessor.HttpContext?.User.Identity?.Name;
}
And the EchoTool with injected UserService:
/// <summary>
/// This is a simple tool that echoes the message back to the client.
/// </summary>
[McpServerToolType]
public class EchoTool(UserService userService)
{
    [McpServerTool(
        Name = "Echo",
        Title = "Echoes the message back to the client.",
        UseStructuredContent = true
    )]
    [Description("This tool echoes the message back to the client.")]
    public EchoResponse Echo(string message) =>
        new($"hello {message} from {userService.UserName}", userService.UserName!);
}
public record EchoResponse(string Message, string UserName);
References
- https://github.com/NikiforovAll/mcp-template-dotnet
- https://modelcontextprotocol.io/specification/draft/basic/authorization
- https://den.dev/blog/mcp-prm-auth/
- https://den.dev/blog/mcp-csharp-sdk-authorization/
- https://github.com/modelcontextprotocol/csharp-sdk/blob/main/samples/ProtectedMcpServer/Program.cs
- https://www.youtube.com/watch?v=EXxIeOfJsqA&ab_channel=MicrosoftDeveloper
- Topics:
- dotnet (58) ·
- dotnet (63) ·
- ai (25) ·
- mcp (9) ·
- mcp-server (6)
